

ARTWORK TUTORIAL
How to create layered wooden pin badges
Learn how to prepare artwork for custom layered wooden pin badges with our step-by-step guide. Discover how to build overlapping layers, align your designs, add cut lines and bleed, and prepare print-ready files for production.

Creating artwork for layered pin badges is all about building your design in separate levels that stack together to create depth.

Start with Your Full Design (Base Layer)
Begin with your complete design as one flat image.

This will become your base layer, so it should include everything — all colours, shapes, and details.
Think of this as the “bottom” of your pin badge.
Build Up Your Layers
To create the layered effect, you’ll now create additional versions of your artwork by removing elements.
- Layer 2 (middle layer): remove background areas so only mid and foreground elements remain

- Layer 3 (top layer): keep only the top details (e.g. outlines, frames, key features)

Each new layer should sit on top of the previous one to create depth.
Keep Everything Aligned
This is the most important part.
All layers must:
- Be the exact same size
- Be positioned in the exact same place
- Line up perfectly when stacked
👉 A good way to check this is to toggle layers on/off, nothing should shift or move.
Add Your Cut Line & Bleed
You’ll need to show us where your pin badge should be cut.
- Create a separate “Cut Line” layer
- This should be a clear outline or sillouhette of your final shape
- Add a small amount of bleed (extra artwork) beyond the cut line to avoid white edges after cutting.

Use Solid Shapes
Each layer should be made from clean, solid shapes.
Avoid:
- Fading edges
- Transparency (unless intentional and discussed)
- Very fine details that may not cut well. Avoid elements thinner than 2mm.
Bold, simple shapes work best for layered designs.
Think in Depth
A good layered design usually has:
- Background (base layer)
- Main subject (middle layer)
- Details or frame (top layer)
Try to separate your design naturally into these parts.
File Setup & Export
- Keep each layer as a separate file or clearly labelled layer
- Use the same canvas size for all files
- Export as high-resolution (300dpi) in .PSD, .Ai, .SVG, .EPS (or any other common format that allows layers)
Not Sure? We Can Help
If you’re unsure how to split your design into layers, just send us your artwork — we’ll help set it up and provide a proof before production.
💡 Tip If your design looks good stacked digitally, it’ll work perfectly as a layered pin.
Submission checklist
Congratulations, you've finished creating your layered pin badge designs! All you have to do now is check the following before submission...
- Bleed of at LEAST 1mm has been added where designs go right to the edge of the cut line.
- All text has been converted to outlines.
- Your template contains 1 layered design only. Additional designs will be sent separately.
Saving and submitting your designs
There are 3 different ways to save and submit your designs...
1. Submit your artwork immediately
If you have already created your designs, you can send them to us using the 'Upload Artwork' button, located on our product pages or by emailing them to ‘info@zapcreatives.com’.
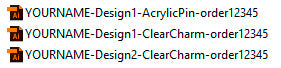
Name each of your designs appropriately so that we know which designs you are referring to. Your file names should include 1. your name, 2. design number, 3. chosen product and 4. the date that you placed your order through our website. Here’s an example…

Select all of the designs that you would like to submit, right click and choose SEND TO > COMPRESSED (ZIPPED) FOLDER.

This will create a compressed folder containing all of your designs. Rename this folder so that it contains your name and the date that you placed your order on our website. Like this…

Please add all of your designs into one folder. So, if you purchased charms, stickers and pins, for example, just pop them all in the same, compressed folder and upload it using the 'Upload Artwork' button.
2. Submit your artwork later
If you have placed your order via our website but your designs aren’t quite ready yet, that’s ok. You have up to 2 weeks to submit your artwork to us, which allows you to take advantage of any special offers that we’re running.
To submit your designs later, save them with 1. your name, 2. design number, 3. chosen product and 4. your order number. Then email them to ‘info@zapcreatives.com’.
Save all Photoshop files in .Psd format. Here’s how…
3. Placing a re-order
If you have placed an order in the past and would like to re-order those designs that’s great! We store your artwork for a maximum of 6 months, which saves you the hassle of having to resubmit your designs via email.
To place a re-order, simply place your order online, email us with your previous order number(s) and let us know that you are placing a re-order.
You may only want to order 1 or 2 designs from your previous order(s). To do this simply quote your old file name(s) and let us know how you would like them producing and in what quantities.
Here’s how to do it…
Hi Zap!,
I’ve just placed an order #12345 on your website and would like to re-order the following designs from a previous order #12121. Please can I have…
10x [YOURNAME]-DESIGN1-CLEARCHARM-12121
20x [YOURNAME]-DESIGN2-WALNUTKEYRING-12121
10x [YOURNAME]-DESIGN3-ACRYLICPIN-12121
Thanks!
[YOUR NAME]
If you have any questions about this tutorial or any other aspects of our website and manufacturing processes, please do not hesitate to get in touch. We’d love to hear from you.